
What’s covered: Step by step of how to create your first wallet
Prerequisites: parts 1-3
Expected outcomes: Putting to practice the theory you learned in parts 1-3, you will go about creating your own wallet, learn what part is your public address (public key) and your private key, how to backup and recover your wallet, and how to simulate making a transaction
Time to completion: 30m
Warning: this wallet is for learning purposes. While MyEtherWallet does a really good job at educating and trying to protect you, you should not use this wallet as described in this tutorial unless you are willing to lose whatever funds you put in. Always double check the URL and SSL cert. More on that below
If you have been following along in this series, you should have a very rough idea of the various parts behind digital currency.
It’s time to get your feet wet and create your first wallet. This will serve two purposes. First by going through the motions, you will be able to spot your own public address that you send out to people in order for you to receive coins. You will also see your own private key and how that plays a part when you send your own coins to someone else. Is it possible to have two wallets? Absolutely. Ownership is the private key of the wallet. You can have as many as you like. If you follow this series you will create and use three wallets.
Let’s dive in..
In Part 2 I described a few different types of wallets. As per those descriptions, we are going to create a “warm” wallet. That is, you will keep your private key locally, rather than being remotely managed by someone else. The website you use will be an interface but the private key will stay local and sign transactions locally before sending out to the blockchain.
If you look around you will find many wallets available. For this tutorial, I’m going to use MyEtherWallet. There are a few reasons for this.
- The interface is a webapp. That means it works on anything with a browser
- MyEtherWallet may not have the most beautiful interface but it is a fantastic learning tool. In fact, it’s the only wallet that I’ve found that tries to educate the user rather than hide complexity behind the scenes. This is great for learning. Once you do this, you will understand how other wallet providing software works.
- You will create a wallet and go through the motions of storing your private key and preparing a backup so you can protect yourself.
- MyEtherWallet as the name suggests is an Ethereum based wallet. Both Bitcoin and Ethereum from a interaction standpoint are nearly identical. After you have gone through the motions of creating a wallet here, you will be more confident using other software and wallets, regardless of what digital currencies they support
Disclaimer: the purpose of this exercise is to practice creating a wallet. Though the wallet you create is fairly secure, the only wallet I will recommend using for any amount of money that is beyond what you are willing to lose will be in Part 7 when we create a cold based wallet.
Head on over to: https://www.myetherwallet.com
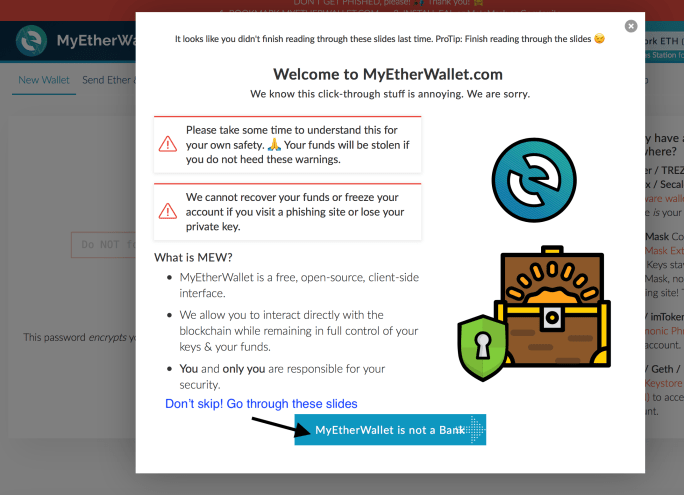
![]()
From there, I highly recommend stepping through the initial slides that appear on first page load rather than skipping. They include some things that have already been covered in Part 1 and 2 but it will be a good refresher.
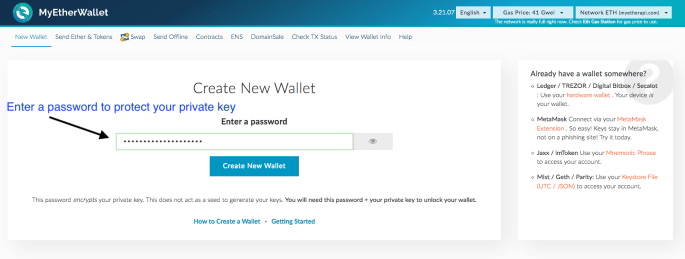
Once you have stepped through, it’s now time to create your first wallet. On the “New Wallet” tab, enter a password you want to use to protect your public and private key. The thing to understand here is that password is not your private key, it is used to encrypt your private key. When you save your private key to a file, the contents will be encrypted and can only be decrypted (used) when you provide the password you protected it with.
Next up, download your backups. MyEtherWallet doesn’t store your private key for you. You will be offered two backups. The first is a keystore backup. The keystore is essentially your public and private key stored in the contents of a file. Download this locally. Your private key won’t be in plain text within it but if someone uses that with the password you provided in the step before, they have full access to your coins.

The second backup is a paper version of your wallet. Here is what makes this whole thing pretty neat. The app, e.g. MyEtherWallet, merely is a tool for creating keys and then helping you interact and use those keys with the blockchain (ledger of transactions). Wallet apps don’t actually hold your coins, they are just tools for interacting. Your private and public key is your wallet. It provides proof of identity against the blockchain and the transactions you were involved in. Print the paper wallet on a piece of paper and never show to anyone. The paperwallet is less secure than the keystore file. It shows your private key in plain text. Like the MyEtherWallet says, neither should ever be shown to anyone.
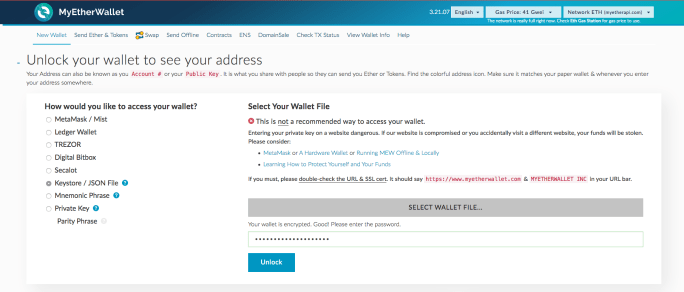
 MyEtherWallet clearly shows the separation between your wallet (keys) and the interface itself. From here you need to provide your wallet (keys) to MyEtherWallet in order to see your balance and do transactions. The safest way to do this is to not use a paper wallet or keystore backup directly. Instead, it is better to use a dedicated hardware based wallet that never actually exposes your private key. We will go through the steps involved in a cold (hardware device) based wallet in Part 7 but since we are just learning, we can use our keystore backup for this section. The reason MyEtherWallet does not recommend using your keystore file is because there are bad actors on the internet who will try to impersonate MyEtherWallet and take your keys. They impersonate by looking like the website but with a different URL or fake certificate. Like it says, always insure that the URL is https://www.myetherwallet.com and that its website SSL certificate is shown in green to the left of it with “MyEtherWallet Inc”. See below screenshot of what this should look like in your browser if you don’t know what a URL or SSL certificate is

In fact, this impersonating attack recently happened.
Warning: If you have more coins than you are willing to lose in a wallet, I can only advocate a hardware based wallet to store them. Since we are learning without actual money, this is a very reasonable way to access your wallet.
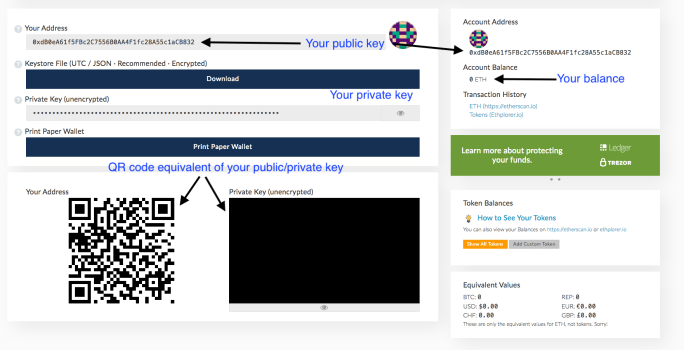
Once you load your keystore you will see all your wallet information in a digestible way. Your public key which, again, is your ID or address that you hand out freely to others so they know how to pay you, is there. As is your private key.
Congratulations, you now have a wallet that you can send and receive coins with! If this seems a little anticlimactic, that’s a good thing! Remember, you have essentially done the equivalent of opening a bank account. Except you didn’t need to provide any details and it’s ready to use within a minute of setup.
What’s next? It’s now time to buy your first digital currency. We will go through the steps of “stepping in” by using your own fiat based currency (e.g. USD, EU, etc) to buy Bitcoin or Ethereum. For this, we will use a different wallet than the one we played with in this section.
Proceed to Part 5!
