
What’s covered: Create an online account and use your fiat based currency (USD, CAD, EU, etc) to buy Bitcoin or Ethereum
Prerequisites: parts 1 and 2
Expected outcomes: You will own your very own digital currency and the know the various ways you can go about getting some more in the future. In subsequent parts you will do your first transaction with it to another wallet of yours and, if you want to, trade it on a big exchange.
Time to completion: 45m initially, can take a few days before your account is verified.
If you have been following along, it is now time to buy and own your first Bitcoin or Ethereum. In Part 2 we learned about how to do this. To obtain coins, there are two ways: mine and bring them into the currency market, much like gold. The other way is to trade with someone. Like sell someone a coffee in exchange for some Bitcoin, much like you would with fiat currency like USD. In this case, we will use a service that will trade Bitcoins for fiat money. This service is essentially an exchange that specifically accepts fiat money and a handful of different types of digital currency rather. When you don’t have any digital currency, this is the easiest way to “get in”. In Part 6 we will use a different exchange. An exchange that doesn’t accept fiat money but will let you trade the digital currency you got from this section and trade for other digital currencies. The reason we use another exchange in Part 6 is that supports many more alt coins.
For this section, we are going to use by far the most popular service, Coinbase. In addition to being around for a while and being very familiar, there are a few reasons for this.
It is very easy to use
The design of the website is very clean and friendly. They support many countries, accept most major credit cards when buying coins, and are transparent about fees.
They create the wallet for you and manage your funds
Behind the scenes, the wallet is created for you when you sign up and log in. All you need is your username and password and they handle all the security and management of your funds by creating wallets for you and keeping your private key secret on their servers. This is known as a hot wallet where your private key lives with them, not on your computer. While you lose this level of control, and while I don’t recommend storing any significant funds that you are not willing to lose, a well established hot wallet like Coinbase is a great way to get started and to buy your first Bitcoin without having to set things up. In Part 6 and 7, we will go through the motions of sending coins to other wallets, and for long term storage, keeping them on a cold wallet, a dedicated hardware device that you own. If you don’t plan on getting a cold wallet, I still recommend reading Part 7 to understand more.
You pay for what you get
Coinbase, in return for this service they charge fees . Depending on your country and payment type, it’s usually between 4-6% interest per trade. These fees come when you make trades. As you learn more, you may choose to explore other options with different levels of services and fees but Coinbase is the most simple and widely used. More on fees at the bottom of the page.
As mentioned, Coinbase will also create a wallet for you when you sign up. That means you won’t need the wallet you created in Part 4. What was the point of Part 4? It is good to know the mechanics behind the scenes. To know what you are trusting Coinbase to protect for you when you use their service.
Signing up
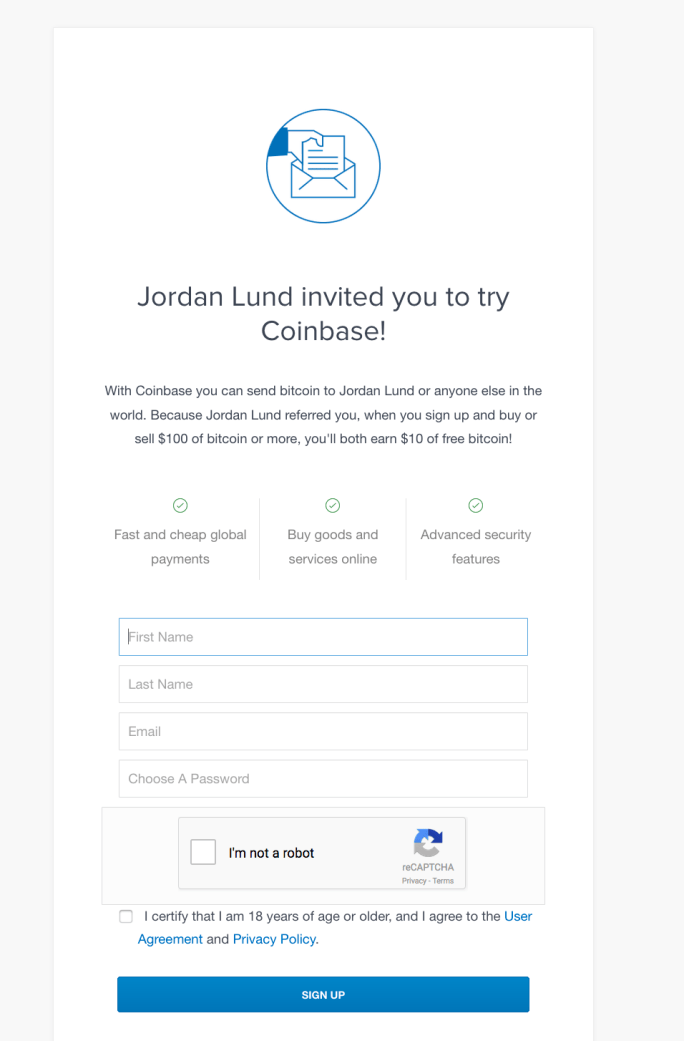
When signing up, Coinbase like most popular exchanges, offer an incentive when you use a referral. What this means is that if you initiate a buy of $100 USD worth or more of Bitcoin within your first 180 days of account activation, you will receive $10 USD worth of Bitcoin for free. Essentially this will wave the normal fees associated with $100 USD worth of transactions. By doing this, the person referring you also receives $10 USD worth from Coinbase. Good for Coinbase to get you to initiate a trade, good for you while you get started and good for the referrer. More on referrals at the bottom of the page.
On using referrals: While I would gently like to encourage you to use my referral, particularly if you have enjoyed and learned from the parts in this series, you may of course not use it and just sign up without a referral.
Coinbase sign up page: https://www.coinbase.com
![]()
Sign up for Coinbase. Use a strong password and an email address you trust.
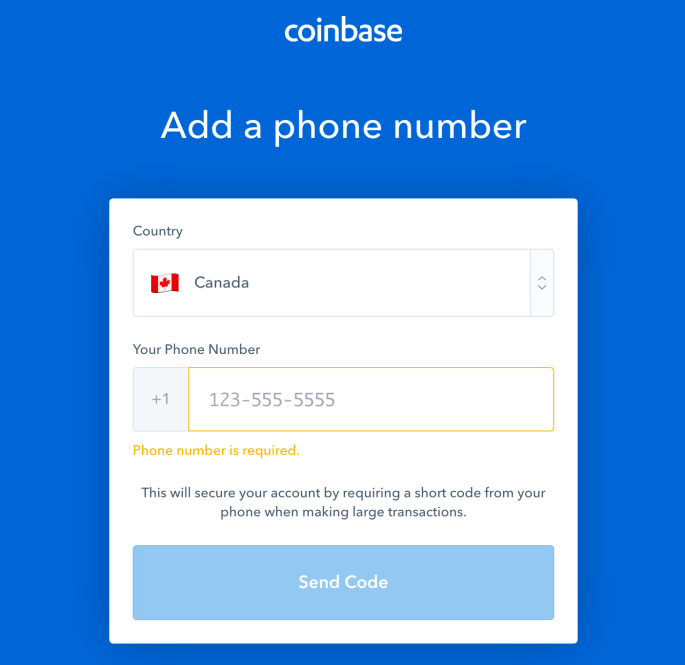
You will then be sent a registration email asking you to confirm your sign up. Once confirmed, Coinbase will ask you to add your phone number as a secondary authentication method, in addition to your email and password. Essentially when you sign in or make transactions, you will receive a SMS text with a pin code you must enter into Coinbase. This is more secure as you are adding a secondary method for authentication. Later in the page we will cover how to use Google’s Authenticator rather than SMS. This is known as multi factor authentication (MFA). This security model has been used by Google and Apple for years, and it basically means that you will need to use your email, password, and a personal device that can receive SMS or Authenticator codes (read, more secure).
Viewing your wallets
Once you have logged in with the code sent to your phone SMS, you successfully have an account. Feel free to navigate around but you will notice that you are not able to buy digital currency yet. This is because you need to provide identity and proof.
Before we talk about why and how to add your identity, I want to point out two pages. Your “Accounts” and “Dashboard” page.
Unlike in Part 4, where you created your wallet, Coinbase has already done this for you. In fact it created many wallets! You can see them on the “Accounts” tab page.
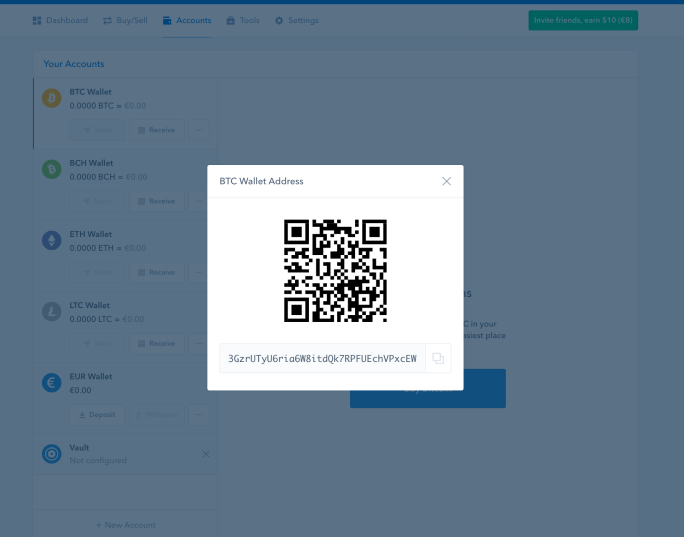
Below you can see an example of this. You have a Bitcoin wallet, Bitcoin Cash, Ethereum, Litecoin, and your own local fiat currency. You can click on any of the “Receive” buttons next to the individual digital currency wallets. This will show you what your public address (key) is. It hides all the other data including your private key behind the scenes. Again, this means Coinbase is protecting and managing your wallets. While convenient and will stop you from making silly mistakes, they control and protect them on their servers. If they are compromised, so are your wallets.
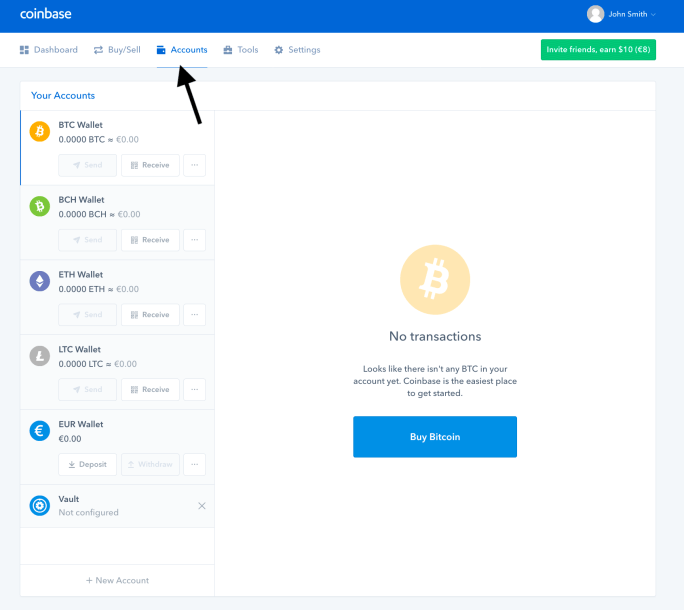
Next up, have a look at the Dashboard page. At the top you will see historical performance summary of each digital currency they support. At the bottom right, a summary of your own worth in each coin ($0 for now). Bottom left, are links to completing your account. What’s left? Proving your identity and choosing a payment method for buying digital currency. Click “Verify your identity”
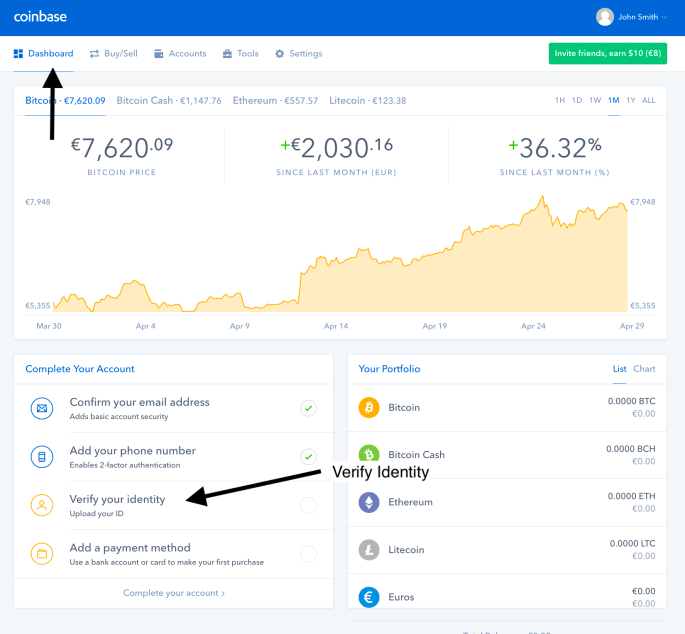
Proof Of Identity
In order to buy Bitcoins from Coinbase, you will need to prove your identity. As a US company, Coinbase legally must comply with local US tax laws and regulations when selling digital currency to users via USD and fiat based money. This means that you must be a real person, with a valid form of ID and living at an address that matches your country account. Much like when you want to open a bank account or investor account. More information on verifying your identity at the bottom of the page.
providing proof can take days: when submitting a photo of your identity and proof of address, this is manually cross referenced at Coinbase. Because of this, it can multiple days before it’s confirmed and you are able to purchase digital currency.
Once you click on verify your identity, you have a few different ID options. Choose one and either use your computer webcam or a photo stored on your computer of your ID. You can also download the Coinbase app on your mobile device and use the phone camera if you prefer.
Follow the steps until you are told that the upload was complete. You should receive an email confirmation stating so.


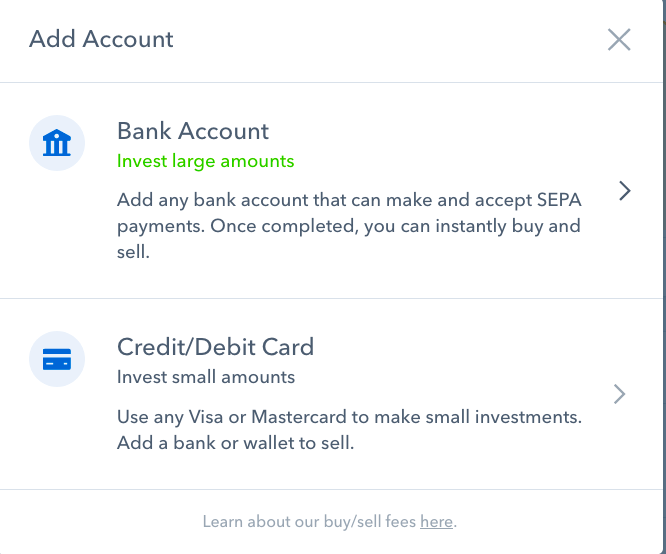
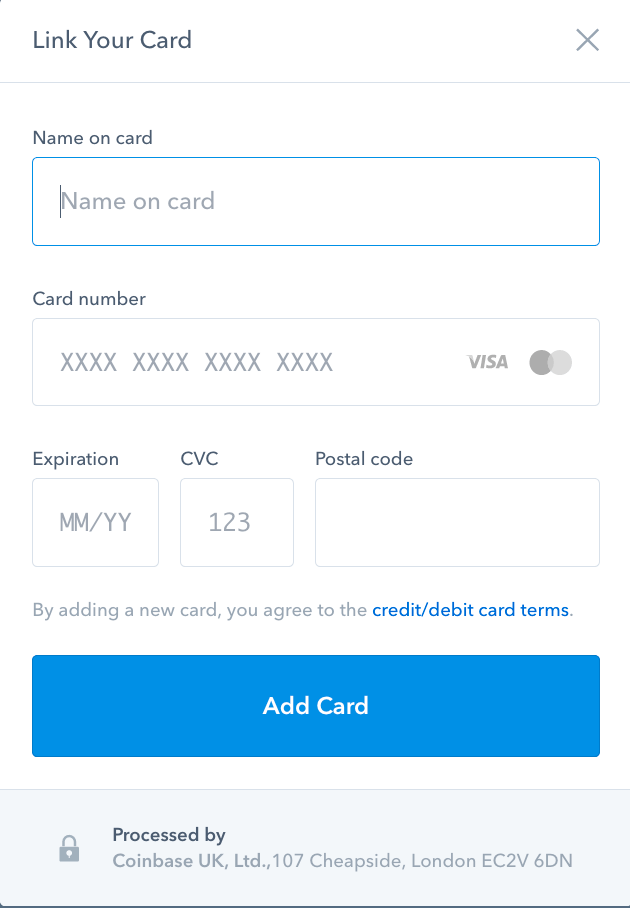
Payment method
Once your proof has been verified, it’s time to choose a payment method. Depending on the country your options will consist of credit or debit cards. Choose one type and card that works for you.
Once a payment method has been accepted, you can now finally buy your first digital currency!
Buying Bitcoin or Ethereum
Now when you click on the “Buy/Sell” tab, you will have the option to buy from one of the four digital currencies they offer. See below an example of purchasing some Ethereum. The same would apply for Bitcoin.
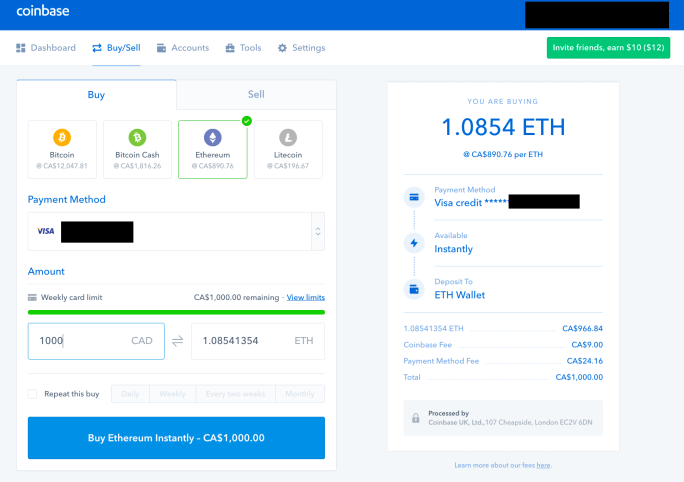
You get what the current exchange rate is between your local fiat currency (e.g. CAD) and the digital currency you want (e.g. Ethereum). You can choose how much you want to buy ($1000 CAD), how much Coinbase will charge in fees and payment charges, and what the total you are purchasing (1.0854 ETH). Once you click on buy on the bottom right, your card will be charged the coins will show up under “Accounts tab” for the currency you bought after a few minutes.
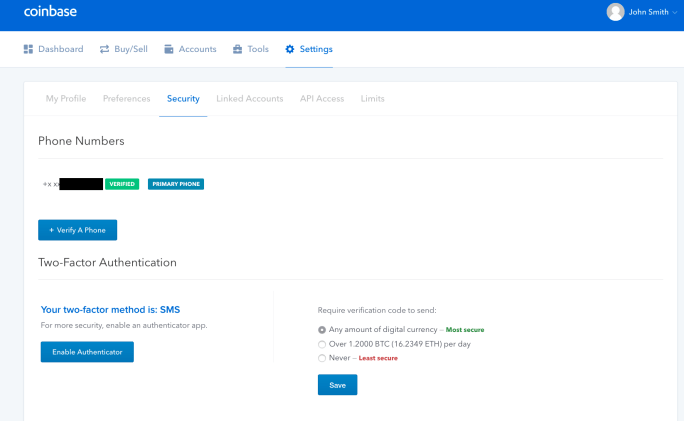
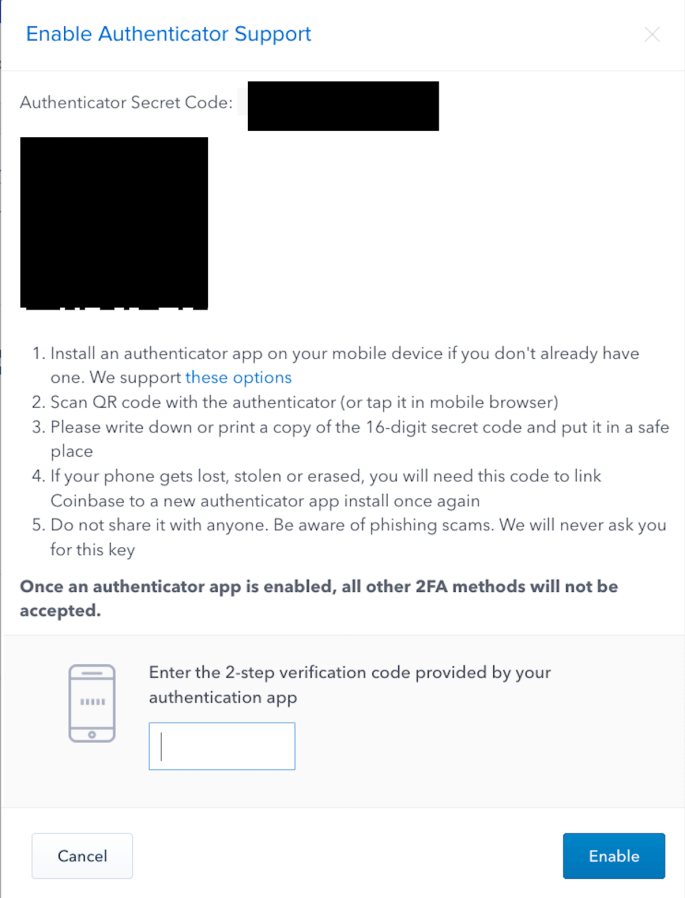
MFA setup for more security
I highly recommend using the Authenticator app to create a form of secondary authentication method. If you haven’t installed Authenticator on your mobile device yet, follow the links for the iPhone or Android app. Once you have signed up to Coinbase, click on the “Settings” tab and then “Security”. Choose “Enable Authenticator” and if you have setup SMS for second factor originally, enter the code that is texted to you when prompted. Now add Coinbase to Google Authenticator by taking a screenshot of the QR code and completing the activation by entering the code given to you from Authenticator app to Coinbase.
If you haven’t done so, you should do the same for your email account that is associated with Coinbase (and all your email accounts) as it helps secure your email more. Again, multi factor authentication means that an attacker has to get your password and have access to your physical device that generates Authenticator codes. Requiring both makes it much more secure.
Congratulations! You are an owner of digital currency. Now what? In the final next two parts we will go through the steps of trading that currency on a big exchange and setting up a cold storage hardware wallet for securing your large amount of funds.
Proceed to Part 6 where we will trade one digital currency for another.
More on:
