
What’s covered: buy, sell, and trade your coin for another on a big exchange.
Prerequisites: parts 1-5, currently own some digital currency (e.g. Bitcoin or Ethereum)
Expected outcomes: take your coins and trade it on an exchange. This is similar to trading USD for CAD. You will learn how to sign up on one of the biggest exchanges and do trades with various cryptocurrencies you are interested in.
Time to completion: 45m to sign up, can take a few days before you’re verified
In Part 2, we covered the idea of a digital currency exchange. As mentioned, it is very similar to a typical currency exchange. You have some form of currency and you are trading for another. These exchanges offer a wide range of digital currencies. There are over 1500 available as of this writing. Like any exchange, these services charge a fee for the trade.
If you are interested in some specific coin outside of the most popular handful of cryptocurrencies, it is most common to buy some Bitcoin (e.g. USD -> Bitcoin) like we did in Part 5 and then trade that Bitcoin on an exchange for the coin you are interested (e.g. Bitcoin -> some alt coin).
Assuming you have done Part 5 or you already own some digital currency, we will use that to trade for another alt coin in this tutorial. For the exchange, we are again going to use the largest, most established service, Binance. There are a few reasons for this:
- It is the largest exchange in the world
- It is supported in many countries
- Supports a wide range of alt coins
- Provides imple or advanced trading options
- It is currently accepting new users. Not all exchanges accept new users all the time.
Signing up to Binance
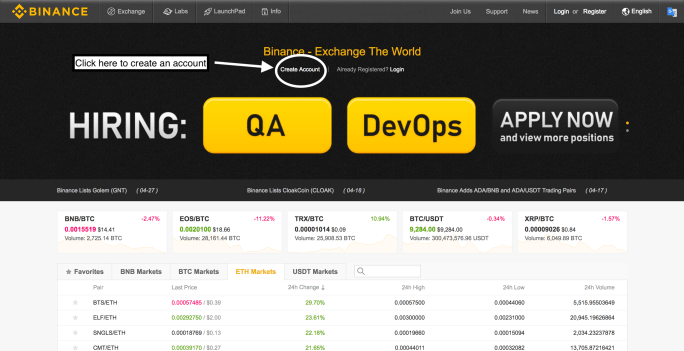
Like Part 5, the links here use my referral. If you are not comfortable with this or did not learn anything from this series, feel free to sign up without a referral. First step, head on over to: https://www.binance.com

Similar to Part 5, you will need to create an account first.
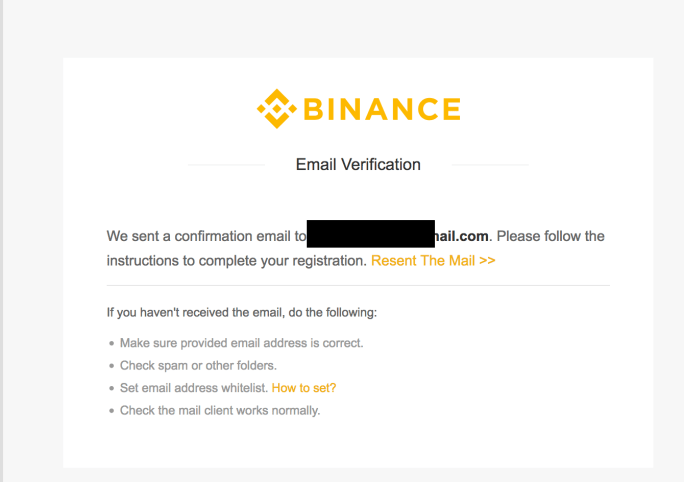
Fill in an email and password and agree to Terms of Use.

You should receive an email verification.
Once you confirm your email you are all ready to start trading! How can you trade without providing proof of identity like we had to in Part 5 with Coinbase? Binance deals with cryptocurrency only. Coinbase lets you trade your fiat based money (e.g. USD) for digital currency. Because of this, you need to provide your proof of identity to Coinbase and as well as what banking information you would like to buy and sell with. Binance will allow you to withdraw, as in send your cryptocurrency within your Binance account outside of their exchange to another wallet, up to 2 Bitcoin every 24h without any verification. If you would like to withdraw more, you will need to prove your identity with a photo copy of a valid ID.
MFA
Like steps in Part 5, it is a good idea to set up multi-factor-authentication. You can do this via SMS or via the Google Authenticator app. For Authenticator installation instructions, see the bottom of Part 5.
In Binance, open your profile by clicking on the person symbol at the top right of the page and then “Account”. You should be prompted to setup MFA with a pop up window. If not, on the right hand side of the middle of the page you will see options to do it via SMS or the Authenticator app. Choose one and follow the steps. Doing so makes it much harder for someone to hack or compromise your account.

Deposit funds into Binance
Like Coinbase and Part 5, Binance creates a wallet for you behind the scenes and manages your private key. As a rule of thumb, you should only deposit what you are planning on trading and nothing more. For long term storage of your assets, I recommend using a cold storage device based wallet. I will cover this in the next and final part, Part 7.
I will assume you are transferring coins from one of your Coinbase wallets like the ones you obtained in Part 5. If you sent those coins to another wallet since then, or you have your own coins outside of Coinbase, the same would apply for depositing to Binance. You simply copy your Binance public address of your wallet of choice, and send coins to that address via whatever wallet you currently store your coins with.
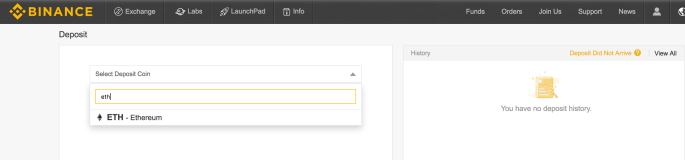
First, click on the “Funds” menu item at the top. Then click “Deposits” to put coins into your Binance account.

Next, type in the name of the digital cryptocurrency you would like to deposit with. e.g. Ethereum or Bitcoin.
warning: make sure you always transfer Bitcoin<->Bitcoin or Ethereum<->Ethereum. Do not mix these two. When you start owning and trading alt coins, this gets more complicated as many alt coins derive from one of Bitcoin and Ethereum so you can use these wallets to store certain alt coins but you can ignore that detail now.
You will be shown your public address of your wallet on Binance.
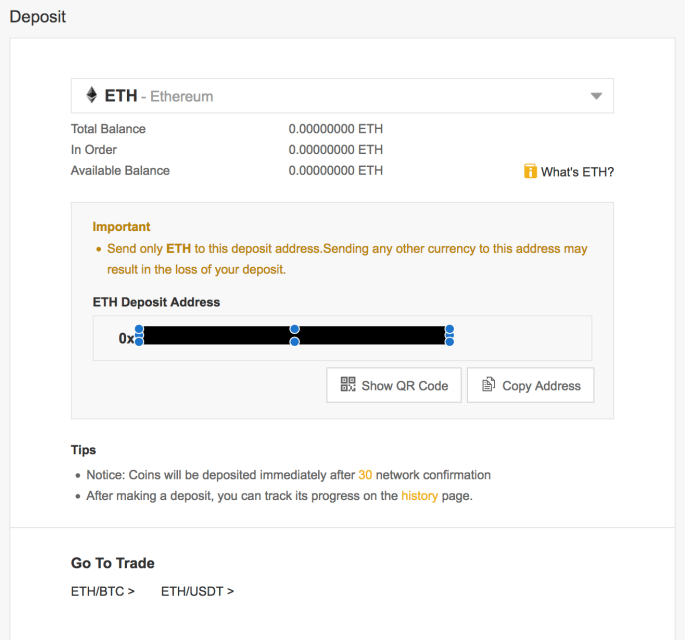
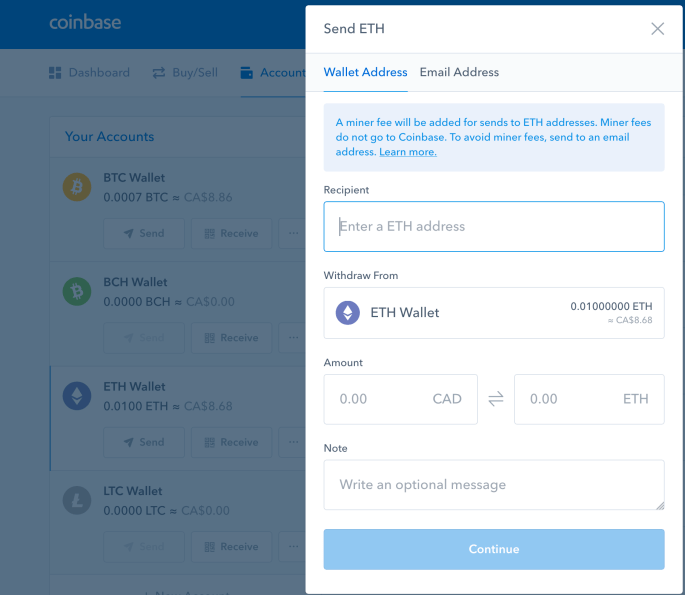
Copy this address and head on over to Coinbase or your wallet where you keep your coins. In Coinbase open the “Accounts” tab and then the “Send” button next to the currency of choice you are sending to Binance.
Where it says “Enter a ETH address” (or “BTC” if Bitcoin), put in the address you copied from Binance. Enter the amount you would like to send to put into your Binance account. You will then be prompted to enter a Coinbase SMS or Authenticator code to confirm you want to send.
warning: double check the address is correct!
After a few minutes you should see the transaction being deposited to Binance by going to “Funds”->”Transaction history” in Binance

It may still be “Confirming”. This essentially means that this transaction is still being mined. More on mining in Part 2 if you forgot what this is. Once the status is “Completed” you have successfully added funds to Binance and can then start trading with the amount you put in.
Your first digital currency transaction
For those following closely, you may have realized that we just made our first transaction! As in, we moved coins from one wallet to another. Both of these wallets it’s assumed are owned by you but none the less, you took advantage of all the elements described in Part 1 and Part 2. Sending coins from one address to a another address and signing for it (if it was from Coinbase, you relied on them signing with your private key). This transaction was then added to the blockchain by computers “mining” (computing and validating the transaction).
Note, this is exactly how digital currency transactions would happen if you were to buy a couch or get paid in work. We are moving money from one place to another.
It’s worth highlighting this as it’s easy to miss since we didn’t use a credit card or bank! Anyway, now let’s get back to trading your digital currency for an entirely different digital currency altogether.
Making a trade
It’s now time to go to the main exchange page. “Exchange” is located via the top left menu tab. I recommend using the “Basic” option.
The exchange page looks more complicated than it actually is. Most of the content is just information about currency market performance and history changes. I’ve taken a screenshot below and highlighted what you can ignore and what you should focus on.
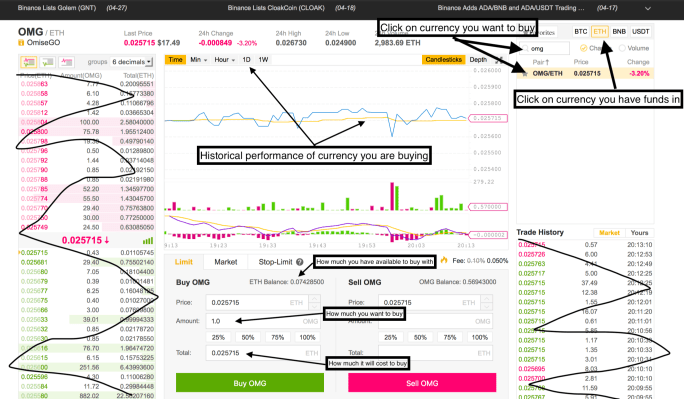
Essentially, you first click on the currency you have funds in and would like to trade with. In my example I deposited Ethereum into Binance so I will click that. See the top right of the screenshot above. You then search for the alt coin you are interested in. In my case I typed “omg”, and finally, click on the search result (OMG/ETH).
Now at the bottom center of the page you have buy and sell options for that coin you want to deal with. There are three options for buying (and selling). The three tabs are:
- Limit
- Market
- Stop-limit
This, again, is similar to many stock and currency exchanges. For the simple situation, you can just use “Market”. This will let you choose how much you want to buy and as soon as it’s available to buy at the quantity you want, you will automatically buy the given amount at whatever the market price at that moment. Limits and stops just allow you to set your high and low thresholds you are willing to buy at, respectfully. Initially for small transactions, I would just use “Market”. When you want to dive deeper and you want more granular control, see here for more details on limits and stop options.
Going back to the above screenshot, you can see that I’m interested in buying OMG with my ETH that I have deposited into Binance. I have 0.07428500 ETH to trade for OMG. At that time 1.0 OMG was equal to 0.0255715 ETH. I was happy with this so I clicked “Buy OMG”.
From there, if I were to immediately go to “Orders” at the top menu bar and select “Open Orders”, I would see the trade in progress (open). Once the order has been filled (complete), it will be in “Orders”->”Order History”. See below screenshot that shows that.

Finally, if I now go to “Funds”->”Balances” it will show that I still have my Ethereum (ETH) except it is 0.0255715 ETH + fees less than I originally deposited and I also some freshly deposited OmiseGo (OMG) in a newly created separate wallet. You may need to check “Hide” to hide all the currencies you don’t have any funds with.

Essentially, I have just gone through making my first successful trade! I started with Ethereum and now have some OMG too.
If you have been following each part in this series, we are nearing the end. We have covered the basic idea of cryptocurrency, the mechanics behind the scenes, created our own wallet, bought our first coin, conducted our first transaction, and made our first trade for a different cryptocurrency.
What’s next? In our final entry in the series, Part 7, we will look at setting up and using a cold storage wallet for securely storing coins. Think of this as comparing a physical wallet to a safe. It’s reasonable to put some money in your wallet for convenience but would you put every penny you have in your wallet? When ready, head on over to Part 7
